Right before Christmas I only treated myself to one new piece of clothing (which is good for me), and it came in the form of a bejewelled mini skirt from Dahlia at the way-too-good-to-not-have-it price of £15 instead of £58. Ever since then though I've been hunting about and found nothing. That was until this last week. I. Can't. Stop. Seeing. Things. I. Want. And Urban Outfitters has the best sale by far right now - and all things that can be worn throughout the spring/summer... if it ever comes.
Everyone has their own opinion on what the perfect body consists of. Through the Internet, magazines and television, the media feeds us images of thin, slender models and diet tips. However, whilst feeling like we must adhere to these unrealistic body expectations, we are also told in contradiction to this that to be a ‘real woman’ you must be curvy and voluptuous with large breasts and hips. Why must there be a specific size that is seen as correct or the right way to be, when many women who are born naturally larger feel the need to starve themselves, whilst women who are naturally thin are made to feel inadequate and boyish, leading to ridiculous implants and cosmetic procedures?
The Nu Project, launched in 2005, is a series of honest nudes of women from all over the world. The project states that without professional models or glamorous make up, its main focus is the subject’s personalities, spaces, insecurities and quirks. These photographs somehow manage to divert the viewers’ eyes from the sexual nature of a woman’s body, and instead encourage them to look at how the woman is sitting, what is she doing with her hands, her expression, her hair, her tattoos, the object she is interacting with, the floor/bed she is sat on, the space in which she is placed. It’s refreshing to be confronted with such a large group of images that concentrate on the personality, rather than the body.
If this takes your fancy and perhaps inspires you to bravely shed your clothes, sign up for a photo shoot via the participation page.
I've always been way more into fashion than any other type of design. I never really cared what my my bedroom, and then, consequently, my student flats looked like, as long as my stuff was in them it felt like mine. However, since returning home in September (thanks recession), and into a new house, all I've wanted to do is to decorate my room. This is probably down to the fact that I'm 22, and for the last 3 years I've been living in my own place and space, and just need to stamp out a space for myself in my mum's home.
this is the currently-barron corner of my awful beige room
The problem that is facing me, however, is how to create a room that I can relax in, but also houses an area where I can get down to my illustration work and not have to constantly have it sprawled all over my bed/living room floor/dining table, just to tidy it all away again at the end of the day.
Pinterest board, A Tiny Workspace, seems to have come to my rescue slightly. So many clever ways of squeezing in little desks and tables so that they don't look completely out of place or get in the way.
Here at Milkshake & Honey we like to embrace all things creative. We love to see a broad spectrum of beautiful, exciting and interesting things, and what makes it a broad spectrum is the contributors. That's why right now we're opening up a window for new regular contributors. If you already have your own blog, or just have always wanted to share things you love or love to do then feel free to get in touch!
I love needle felting so much! I think it is one of my favourite crafts, along with crochet and anything fabric-related. This is one of the easiest crafts I have ever made, all you need to get started is a needle felting needle (using a handle or holder with it makes it much easier but it’s not essential), some felt fibres (I have used merino wool fibres), and a sponge to use as a base. You’ll also need embroidery thread and a needle to make the garland. The sponge stops you accidentally stabbing yourself. But do take care during this craft, as it hurts if you do manage to accidentally get your finger or thumb!
Take a piece of felt fibre about 1.5cm wide and 50cm long. Tease it out.
Using your fingers, roll this up into a rough ball shape. The shape only needs to be rough at this stage as you’ll use your needle to felt it into a more rounded ball shape.
Using your needle, make small stabbing motions into the ball. The fibres have tiny hooks on them, like Velcro, and the stabbing motion and barbs on the needle make the fibres cling to each other, hooking them over each other.
Keep turning your ball as you are stabbing it, to make sure the shape holds. Keep stabbing the ball until you can feel it firming up.
When you are satisfied with the shape of your ball, move on to the next one! Keep going until you have as many needle felted balls as you’d like. Take your embroidery thread and thread it through the balls. Space the balls out where you want them on the garland. Now hang it up and enjoy how lovely it is!
The great thing about this craft is how many different colour combinations can be used. You could try neutrals with a bright accent colour, a crazy mix of bright colours, or pastels to fit in with a Spring theme. You can also make the balls as big or little as you like, or totally mix them up. To make a bigger ball, simply use more felt fibre, or to make a smaller one, use less.
I started needle felting using this. I can’t recommend them enough, super fast delivery as well as quality products!
This adorable Etsy shop is packed full of powerful, yet cute, little handmade items, ranging from stickers, to pocket mirrors, to zines. Midge, the owner, describes her shop as an outlet for all her outspoken and quirky feminist arts and crafts. As well as being beautifully handmade and unique, the items are very affordable. Who said you can’t look great and feel feminine whilst fighting for your rights?
To find out more about the artist and shop owner, check out Midge’s blogs on tumblr and blogspot.
Ghost World Pocket Mirror $4.50 (approx. £2.99) Cool Cat Patch in Floral $5.00 (approx. £3.32) Limited Edition Signed Mini Cup of Tea Print $10.00 (approx. £6.64) Diamond Post Earrings in Ruby $8.50 (approx. £5.64)
I visited London last Wednesday and saw some of my favourite exhibitions to date, so I thought I’d share them with you. As I have been dealing with gender-based issues within my own work recently, the exhibitions I aimed to see carried similar themes, so if you are sensitive or uninterested in Feminism or gender inspired art, keep reading, as I hope these exhibitions will inspire you to take interest and consider how easily comforting it can be to relate to artwork such as this.
JUDY CHICAGO & LOUISE BORGEOIS, HELEN CHADWICK, TRACEY EMIN
A Transatlantic dialogue 14th November 2012 – 10th March Ben Uri Gallery
This exhibition consists predominantly of a selection of work by critically acclaimed American artist, Judy Chicago. Viewing this exhibition is like taking a trip back in time, working your way through the artwork, from Chicago’s earliest Feminist works to present day. Bourgeois, Chadwick and Emin contextualize Chicago’s work, allowing to viewer to draw their own exciting comparisons and ultimately see how the work has developed over time.
Judy Chicago touring and giving a detailed commentary of her work at Ben Uri.
ANNABEL NICOLSON
Film in Space: An exhibition of film and expanded cinema selected by Guy Sherwin 15th December 2012 – 24th February 2013 Camden Arts Centre
Annabel Nicolson exhibits amongst an array of other film makers/artists in this wonderfully neat and tidy show at Camden Arts Centre. Any obsessive compulsively neat person viewing Film in Space will find this exhibition extremely pleasing to the eye. I found it very charming and beautiful for film to be displayed in such an original way; the way the film rotates around the spool is almost an artwork in itself. Out of all of the gorgeous works here, I recommend Annabel Nicolson’s, but of course if you get a chance to visit, please view all of the work. Take-away information is displayed on many of the works and there are files full of information on Nicolson and a digital copy of these are available through the bookshop. Simply give the bookshop assistant your e-mail address and the artist will e-mail you the information (I have yet to receive mine but I am sure it is on its way).
Nicolson’s work is curiously private and personal, much like Judy Chicago’s, and I felt quite privileged to be allowed to view it. There was something unapologetically delicate and feminine about the work, but rather than losing strength because of this, I felt that the work gained character and power.
Ones to see:
I also would urge any art fan to check out the bookshop at the Camden Arts Centre. There is a sale on at the moment and I picked up a Lorna Simpson book for a mere £5. The blurb is as follows;
'At a time when relations between races, cultures and genders are often confused and uncomfortable, Simpson’s efforts to reveal the knots of ignorance and misunderstanding that restrict our sense of community have an importance that goes beyond the usual perimeters of art.'
Captions; 1. Women and Smoke, Judy Chicago. 1974. 2 &3. Autobiography of a Year (140 drawings), Judy Chicago. 1993-4. 4 &5. Piano Film, Annabel Nixon. 1976. Black & white.
I have a new woman crush, and it takes the form of Jemima Kirke. After watching the entire first series of Girls just the other day (I know, it does seem I have no life) I can't get enough of her amazing style, not only as Jessa, but as Jemima herself. Recently I'm starting to feel a bit more grown up - probably because I finished university and got a job - and with that has come the feeling that I want to start dressing a little more grown up, too.
Kirke seems to embody laid-back style, but it's her tattoos and jewellery that give her an edge. She wears the sort of things I used dream of wearing when I was a teenager, but, alas, I was too young and weirdly shaped, and not body-confident enough to pull off then. Plus, she almost makes me just a little bit proud to be British right now.
Ah, Valentine’s Day is upon us. Here is some lovely fabric-y Valentine’s love to warm your heart and get you in the Valentine’s mood (if you’re like me and that’s what makes your heart happy).
Candle making sounds a bit unnecessary and like a granny-craft, but this type of method is actually really useful if you already use candles and you’ve got annoying leftover bits. You can mix them for different smells and colour combinations so you’re not wasting any of the little useless scraps at the bottom of store-bought candles. All you’re essentially doing is re-melting them to become useful again! The equipment is so cheap and because you buy it in multiples, you’ll be able to keep reusing the end bits every time to mix them differently. I took the build up from the sides of a red coloured candle that had too much wax for its pot, and added the leftovers from a gorgeous smelling one I’d just finished.
YOU'LL NEED:
Old candle wax
Wicks (I bought a pack from ebay containing 6 metal bases and a length of cotton wick core for about £1.50)
Mould (I’ve used a cookie cutter on a baking tray to get the heart shape, but if you’ve got a cute mould like a glass pot or teacup then that’s a better and less messy option)
Saucepan
1)Prepare the wick in the mould first, so that it’s ready as soon as the wax has been melted. Thread the cotton core through the metal base and sit it in the bottom of the mould/on the baking tray. Find a way to anchor the wick so that it stays upright and won’t fall in to the wax – I used a fork but chop sticks would be just as good.
2)Break the wax in to small pieces and put on a low heat to melt. Once it’s all liquid, pour in to the mould.
3)At this stage you can experiment a bit. If you have different coloured waxes, you can partially fill the mould with one colour and wait for it to set before pouring in another colour and making layers.
4)If you’re using a cookie cutter and baking tray, and any of the wax leaks out then put pressure on the cutter to contain what’s already inside and wait for it to set a bit more. Then you can scrape the set wax from around the cutter and re-melt it to add to the top.
5)Leave the candle to set, making sure the wick is central to the candle and isn’t bent so that it burns evenly and more safely.
As long as you make sure you’re staying safe and following basic fire and cooker safety information, this is such an easy project. From this technique you can try ideas like adding glitter or finding all sorts of moulds.
I'm not usually one for Valentine's Day - I've never received any sort of present, and I've always thought it was a bit of a waste of money. But, I do always seem to dress up slightly more for the day, it seems like a good excuse.
Laura Lombardi's jewellery seems like it would be the perfect addition to any outfit, never mind a Valentine's one. The simplicity and clean lines mean each piece could be easily paired with so many dresses, blouses and tops to dress up even the plainest clothes... I think I want my first ever Valentine's present.
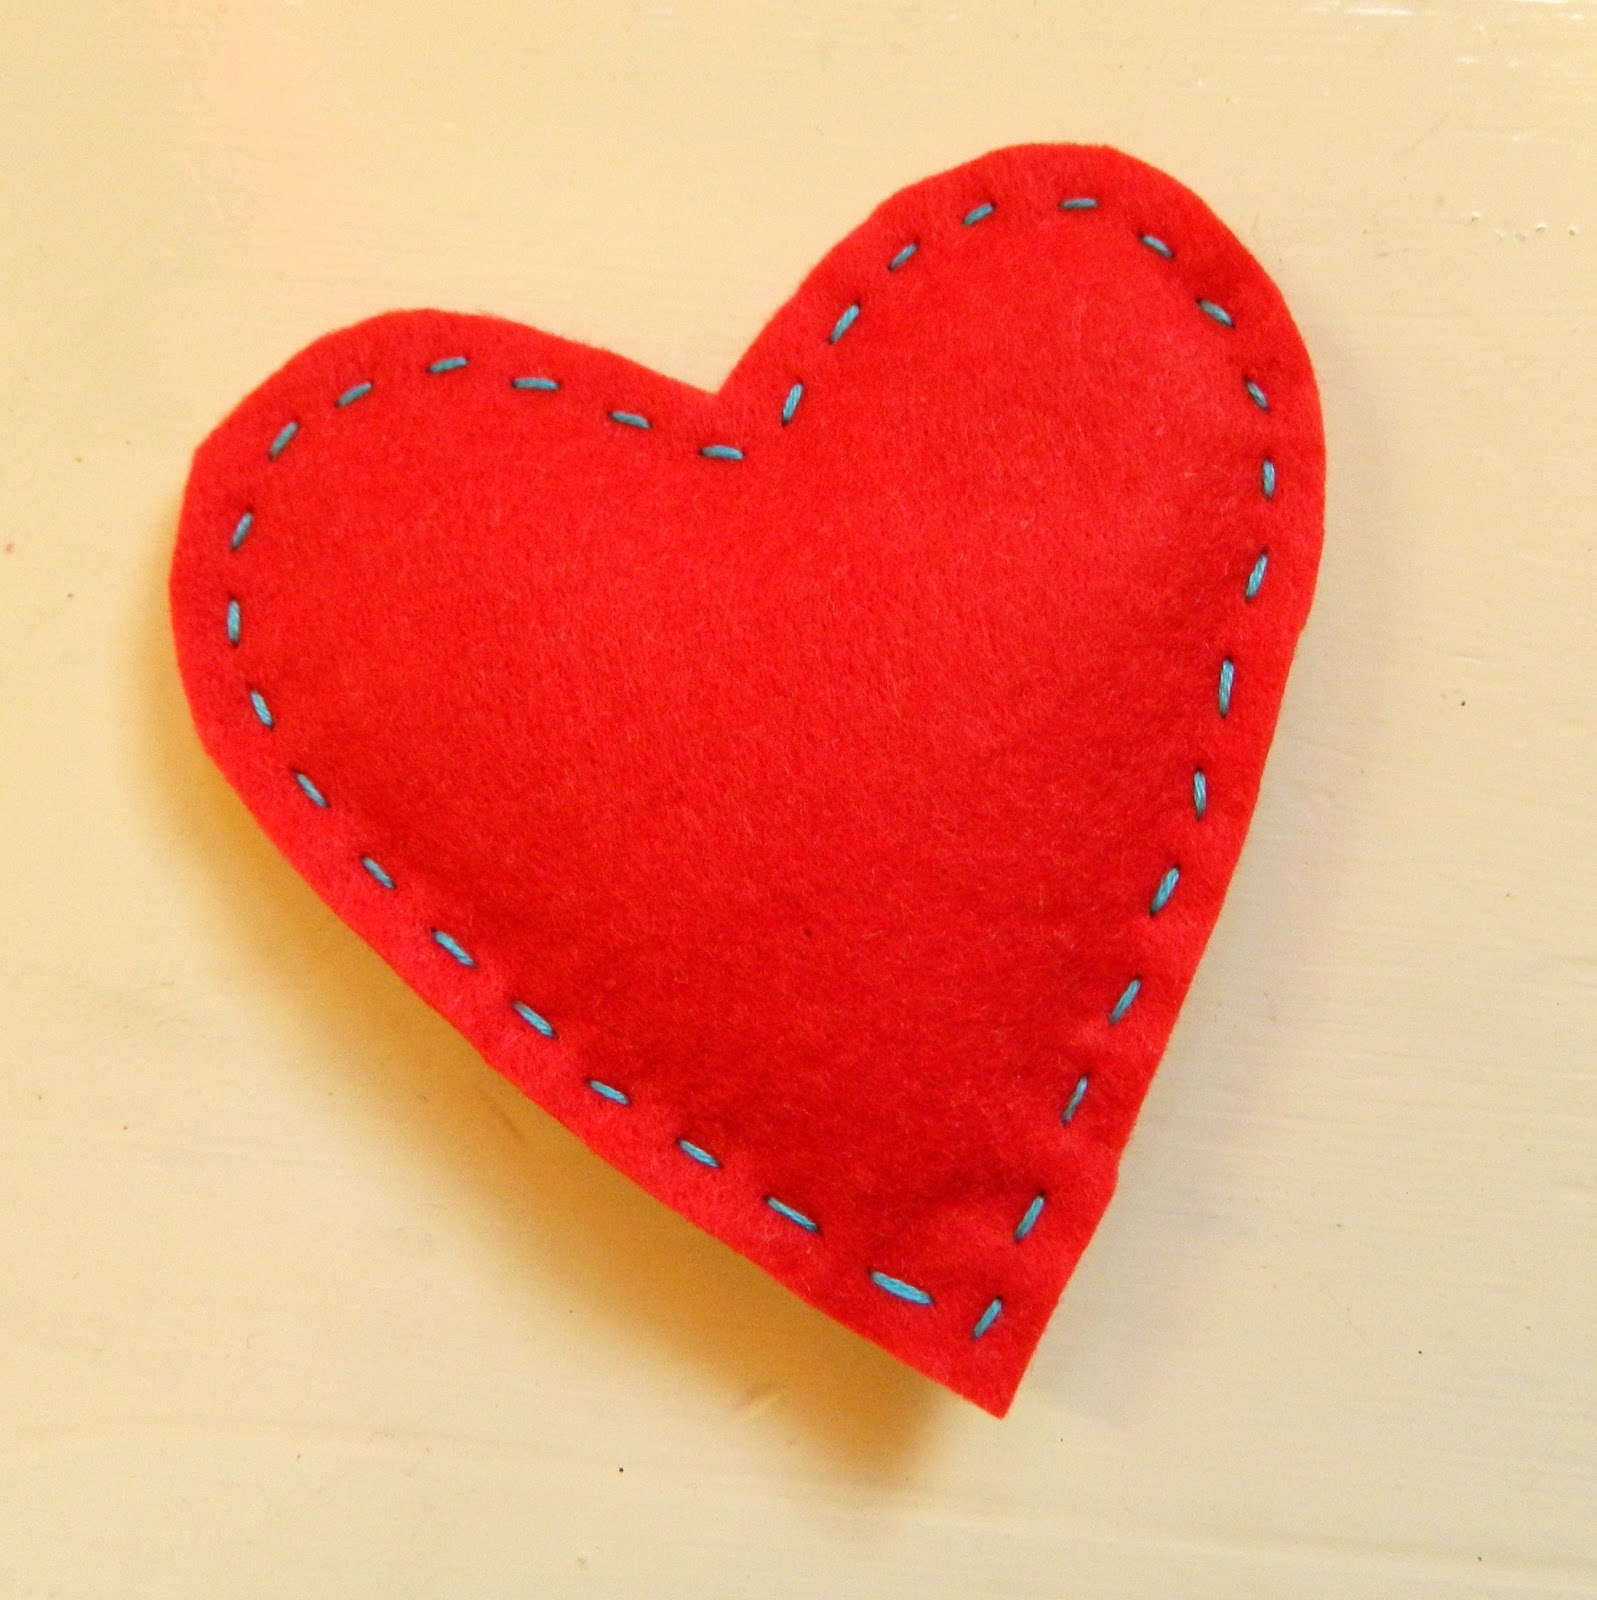
While Spring may well be on its way, I can’t help but feel that it’s always good to have a stash of things to keep you warm, especially with this crazy unpredictable weather we are having. So, with this thought in mind, this week we are making a super cute heart hand warmer.
This craft is really easy and is perfect for anyone new to crafting. You can make it as complicated or as simple as you like and it’s very open to being adapted and decorated.
You’ll need some felt (wool felt would be the ideal, but I used some cheap acrylic felt I had lying around and it worked well), embroidery thread in a colour that makes your heart sing, long grain rice, a teaspoon, and a needle for your embroidery thread.
First you’ll need to cut two hearts from your felt. If you want to decorate one or both of the hearts, then now is the time to do it. A little bit of embroidery would look gorgeous!
Place your hearts wrong sides together and start to sew around the edge. Embroidery thread works well for this as the colours are so bold. Use a small running stitch – if your stitches are too big then the rice will come through. Start at the bottom of the heart and work your way around. When you have only about 4 or 5cm left to stitch, stop, but don’t fasten your thread off.
Holding your heart open, use your teaspoon to fill it with the rice. Leave a bit of room in the heart, as the rice needs room to move around. Once you’re satisfied, continue sewing. Fasten off your thread.
If you want to make a scented handwarmer, you could try mixing in a few drops of essential oil, spices or lavender with your rice.
Yay! Now just pop it in the microwave for 20-30 seconds and your lovely heart warmer can keep your hands warm through all kinds of weather!